- 05 Jan 2022
- 3 Minutos para leer
- Impresión
- OscuroLigero
- PDF
Upgrading to v1.12
- Actualizado en 05 Jan 2022
- 3 Minutos para leer
- Impresión
- OscuroLigero
- PDF
What is the impact of updating?
As of version 1.12, we include Permissions Sets with the app to simplify the setup process. We have bundled the following four Permissions Sets with the managed package:
- ScreenMeet Agent
- ScreenMeet Admin
- ScreenMeet Supervisor
- ScreenMeet Service
Bundling the permission sets helps reduce the complexity of setup and the maintenance burden of future releases.
If you are upgrading from version 1.10, migrating the permission sets is optional; however, it will avoid manually updating them in the future.
How to Upgrade
Install the new package version by using the following link:
https://appexchange.salesforce.com/appxListingDetail?listingId=a0N3A00000EJdXxUAL
Migrate to the new permissions sets
Migration to the new permission sets is simple, but allow time to migrate the users from the old permission sets to the new ones depending on the number of users that will be moved over.
You can use one of two approaches: Manually or using the data loader.
Step 1 - Rename "Old" permission sets
Update the labels of your old permission sets to avoid confusion, as you may now have duplicate permission set names as a result of adding the managed permission sets.
On the Setup page, go to Users > Permission Sets or use the Quick Find box.
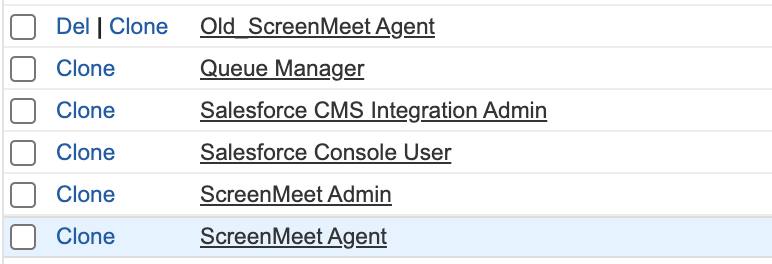
Inside the Quick Find box, you will find some duplicated permission sets. You can identify the differences by the actions that you have available:
- New Permission Sets will only have the Clone option available.
- Old Permission Sets will have both the Delete and Clone options available.
Update the label of the "Old" Permission Sets to something that can be easily identified, such as "Old ScreenMeet Agent". The display will look similar to the following screenshot:

Repeat the process for all the "Old" Permission sets.
Step 2 - Migrate users
Next, migrate the users from one permission set to the other.
We recommend using two browser windows open side-by-side with the two equivalent permission sets open in the Manage Assignment section, as shown in the following example:

In this case, we show the "Old_ScreenMeet Agent" on the left and the newer "ScreenMeet Agent" on the right.
In the window on the right, click on Add Assignments. Make sure all the users present in the left window are added to the window on the right.

Once all the users are selected, click Assign, then Done. Be sure to consider that, depending on the size of your organization, you may have multiple pages of users for each Permission Set.
Repeat this process for every type of user:
- ScreenMeet Agents
- ScreenMeet Admins
- ScreenMeet Supervisors
- ScreenMeet Service Account
Step 3 - Remove "Old" permission Sets
After Migrating all the users to the new Permission Sets, you should remove all the users from the Old Permissions Sets and then remove the old Permission Sets to avoid confusion.
Optionally, you can keep the Old Permissions Sets to have a backup of the assigned users and remove all the permissions until you are 100% sure that every user has been migrated.
Step 4 - Service Account
There are restrictions on which permissions can be in a Permission Set inside a Salesforce Managed Package. For that reason, you will need to set up permissions for the Service Account.
Please follow our Service Account setup instructions at the following link:
https://docs.screenmeet.com/docs/salesforce-service-account-setup
Data loader
This documentation will not cover the data loader since gathering all the correct information will depend on your organization setup.
Using the Data Loader is the best option for organizations with many users, but it requires an advanced Administrator with knowledge of the organization's setup.
Instructions for using the Data Loader are located here:
https://help.salesforce.com/articleView?id=000322112&type=1&mode=1
CSP migration
As part of improving the setup for current and new users, ScreenMeet has integrated the CSP policy into the Managed Package, so you can remove the former CSP policy.
We also reduced the scope of the CSP policy to the minimum required to improve security and avoid issues with other CSP policies.
To remove the old CSP policies:
- As a System Administrator, go to setup.
- Use Quick Find to look for CSP.
- Find your old CSP. The trusted site URL should point to "*.screenmeet.com" and it should NOT have an icon in the action column.

- Remove the "Old" CSP policy
Updated ScreenMeet Component
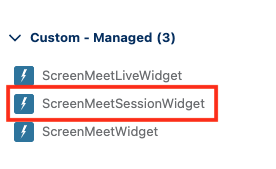
The latest version of ScreenMeet requires adding the latest ScreenMeet component to your page layout. Replace the ScreenMeetWidget or ScreenMeetLiveWidget with the ScreenMeetSessionWidget.

.png)
