Introduction
Reducing the time spent on creating a session for agents is crucial for efficiency.
By following a few simple steps, you can optimize the process using copy and paste and declarative coding methods. This documentation provides step-by-step instructions to streamline the session creation workflow.
Prerequisites
Before proceeding, ensure that you have already set up a chat bot and embedded chat. If you need assistance with these setups, you can refer to the following resources:
https://trailhead.salesforce.com/content/learn/projects/build-a-community-with-knowledge-and-chat
https://trailhead.salesforce.com/content/learn/modules/einstein-bots-project-planning
Setting up the code
To begin, create the class that will be called by the chat bot to initiate the session. Follow the instructions below:
- Navigate to the "Apex Classes" section in the setup menu by using the quick search.
- Click on "Apex Classes" to access the class list.
- Create a new class by selecting "Create New."
- Copy and paste the following code into the code editor:
public with sharing class SessionCreateQuickAction {

    public class SessionCreationInput {
        @invocableVariable(required=true)
        public string description;

        @invocableVariable(required=true)
        public string sessionType;

        @invocableVariable(required=true)
        public string parentType;

        @invocableVariable(required=true)
        public string parentId;
    }

    public class SessionCreateResponse {
        @InvocableVariable(required=true)
        public screenmeet__Live_Session__c record;
    }

    // Return service account to set is as the owner of the session
    // extrenal ACL will determine which agent its the actuall owner
    // by looking the owner of the parent object
    public static Id getServiceAccount() {
        PermissionSet pSet = [SELECT Id FROM PermissionSet where NamespacePrefix = 'screenmeet' and Name = 'ScreenMeet_Service' limit 1];

        PermissionSetAssignment pSetAssignment = [SELECT AssigneeId,IsActive,PermissionSetId FROM PermissionSetAssignment WHERE IsActive = true and PermissionSetId = :pSet.Id];

        return pSetAssignment.AssigneeId;

    }

    @InvocableMethod(label='Create a Screenmeet Session' description='Creates and returns a screenmeet session')
    public static List<SessionCreateResponse> QuickActionTest(List<SessionCreationInput> inputs) {
        List<SessionCreateResponse> response = new List<SessionCreateResponse>();
        string SERVICE_ACCOUNT_ID = getServiceAccount();

        for (SessionCreationInput input : inputs) {
            screenmeet.ScreenMeetAPI.ScreenMeetSessionParams newSession = new screenmeet.ScreenMeetAPI.ScreenMeetSessionParams(
                input.sessionType, //session type
                input.parentId, //parentObjectId - in this case, the Service Appointment ID
                input.parentType, //owner object type which will show back up in the ScreenMeet Live Session table
                SERVICE_ACCOUNT_ID, //owner id to enable ScreenMeet ACL functionality
                input.description, //the description of the call
                'svc_acc' //name of the owner
            );
            Map<String, Object> SMresponse = screenmeet.ScreenMeetApi.createSession(newSession);

            // Get the salesforce ID from the response
            Id extObjId = SMresponse.get('externalSessionObjectId').toString();

            // Grab the session from salesforce
            screenmeet__Live_Session__c ls = [SELECT Id,screenmeet__pin__c,screenmeet__Session_Id__c,screenmeet__user_url__c, screenmeet__parentObjectId__c, screenmeet__parentObjectType__c FROM screenmeet__Live_Session__c WHERE Id = :extObjId];

            // Create instance of the rurn type
            SessionCreateResponse s = new SessionCreateResponse();
            s.record = ls;

            // Add it to the response
            response.add(s);
        }

        return response;
    }

}
Notes
If you cannot find the "Apex Classes" menu or the "Create New" option, please request assistance from your Salesforce Admin.
They can provide the necessary permissions or help you with this step. If your organization has a Salesforce Developer, you can reach out to them for support.
Permissions
Determine the user account that runs your bot. By default, this is the Integration User. Follow the steps below to create a new permission set and assign the required permissions:
- Go to the setup menu and search for "Permission Sets" in the quick find box. Select "Permission Sets" from the search results.
- Click on "New" to create a new permission set.
- Fill out the form with the following values:
| Field | Value |
|---|---|
| Label | Create Session Quick Action Perm Set |
| API Name | Create_Session_Quick_Action_Perm_Set |
| Description | Permission Set used to grant minimal access required to be able to execute the Create Session quick Action |
4. Click "Save" and proceed to assign permissions.
Apex Class Access:
- Click on "Apex Class Access."
- Click "Edit" and add the following classes to the permission set:
- SessionCreateQuickAction
- Screenmeet.ScreenMeetAPIHelper
- Screenmeet.ScreenMeetAPI
Object Settings:
- Select "ScreenMeet Live Sessions" from the Object Permissions list.
- Enable Read access for the object.
- Under Field Permissions, enable Read access for the following fields:
- PIN
- Session Id
- User URL
4. Click "Save" and return to the Permission Set Overview.
System Permissions:
- Select "System Permissions" and click "Edit."
- Enable the "View Setup and Configuration" permission.
- Click "Save" and proceed to the next step.
Manage Assignments:
- Click "Save" and then select "Manage Assignments."
- Add an assignment and search for the user you are using for your bot (typically named "Integration User").
- Do not assign an expiration date.
Integrate it with your existing bot
In this section, we will cover the basics of creating a session using the Apex action. You can choose where to add this action based on your requirements. Assuming you have identified the appropriate location, follow these steps:
- Define the two out of the four inputs required for the "Create a Screen Meet Session" action:
| Input | Description |
|---|---|
| description | Just a description for the session, you could either ask the user for one, hardcode some text or use the subject if you have access to it |
| sessionType | It indicates the type of session to be created and must be one of the following values: live, support, cobrowse, replay |
2. Drag and drop the Apex action from the Dialog Component Library to the desired location.
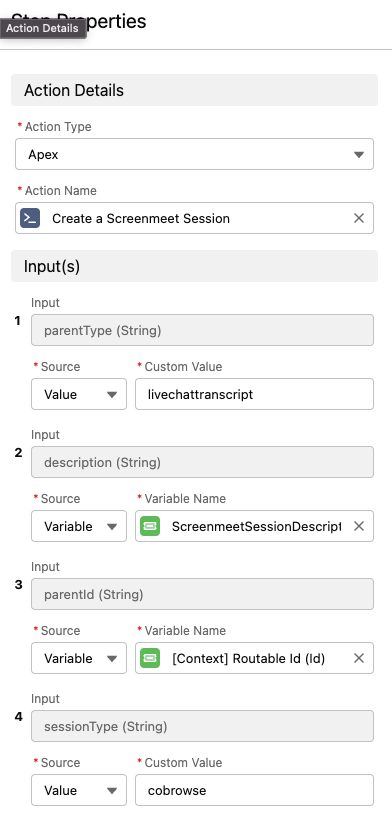
3. Configure the action as follows:
Action Details:
| Field | Value |
|---|---|
| Action Type | Apex |
| Action Name | Create a ScreenMeet Session |
Inputs:
| Input Name | Source | Value |
|---|---|---|
| parentId | Variable | RoutableId |
| parentType | value | livechattranscript |
| description | Either Value if you want to hardcode or variable | a hardcoded text or a variable storing your desired description |
| sessionType | Either Value if you want to hardcode or variable | a hardcoded session type or a variable that contains your desired Session Type |
Output:
You can store the output in a variable or ignore it, as the session is already attached to the chat transcript.
When to use ScreenMeet with your chat bot
Listed below are some chat topics that may lead to a ScreenMeet Session.
Employee Help Desk
- Password change / reset
- Administrator access
- Email setup on phone
- Can’t receive email
- Can’t send email
- Email sync issues
- Email setup
- Outlook calendar issues
- Email client is slow
- Email setup on Gmail
- Recover deleted emails.
- Upgrade an app on device / desktop
- Adding a new app to a device / desktop
- Camera not working
- Microphone not working
- Speaker not working
- Desktop computer running slow
- Can’t connect to VPN
- Device running hot
- Device port not being recognized
- Device freezes
- Device won’t restart
- Interference in video
Customer Technical Support
- Hardware
- Password change / reset
- Device running hot
- Device port not being recognized
- Device freezes
- Device won’t restart
- Apps on device not working
- Apps on device not working after upgrade
- Systems
- How do I do a specific function
- When I do x, y happens
- I don’t have access to a feature
- I don’t have permission to use a specific feature
- Where do I find training
- Where do I find documentation
- Who is my account rep
Customer General Support (Consumer Goods, Finance, Education, Hospitality, Healthcare, Telecom)
- How do I use a feature of your product
- Something on my product is not working
- I need a replacement part
- Set up auto pay
- Pay a bill
- Understand details of a bill
- Transfer funds
- Schedule an appointment
- Make a reservation
- Change my plan
Sales
- Product comparison
- Choosing the right product
- Choosing products that work together
- Determining how much to buy
- Searching for a specific item
- Adjusting contents of shopping cart
- Payment information entry
- Gift card and coupon entry
- Multiple payment types for a purchase
- Shipping instructions
- Returning something
- Exchanging something
Example of a ScreenMeet + Virtual Agent Flow
- Bot: How Can I Help
- Customer: I can’t do, this is broke, where do I find, etc.
- Bot: AI Answer
- Customer: I still need help
- Bot: What would you like to do (show a subset of these based on use case)
- Chat with a human agent -> chat
- Have a video call with an agent -> Live
- Show my screen -> Live
- Record my question/issue -> Replay
- Have an agent fix my equipment –> Remote Support
- Shop with an agent -> CoBrowse
Conclusion
By following the steps outlined in this documentation, you can optimize session creation for your agents. With a streamlined workflow, agents can quickly initiate sessions, saving valuable time. Now your chat setup should resemble the following example:
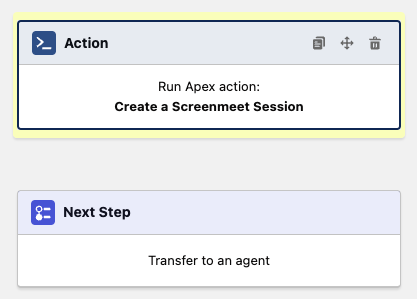
Now, after completing the steps mentioned above, you can save your changes, activate your bot, and test it using the preview functionality within the bot builder.