- 31 Jan 2022
- 2 Minutes to read
- Print
- DarkLight
- PDF
Instructions to Person at End Point Device
- Updated on 31 Jan 2022
- 2 Minutes to read
- Print
- DarkLight
- PDF
Remote Support Installation Overview - End User
The following article outlines what an end user at a device that needs assistance should reference.
Note: the application/executable that is ran is used at a per-session level. What this means is that the application does not persist on the agents device once the session has been completed. The user does not need to uninstall any program and at most, may want to optionally delete the executable file for space saving purposes.
Session start/creation
An agent that has access to ScreenMeet Remote Support must create a session on the user's behalf. Once the agent has created a session, they will have three primary ways of guiding the user to initiate the session on the device.
- Navigate to myhelpscreen.com and have the user enter the pin that is visible on your ScreenMeet console/CRM widget relating to their support session
- Send the user the myhelpscreen.com/pinhere link (this is automatically generated - "pinhere" will be replaced with their unique session code and is provided to the agent upon session creation) for them to click to start the download
- Launch the pre-installed MSI and enter the pin.
- Once the pin has been entered, the user will be prompted to download the application. The user must click "start download" and then click to open the executable fi
Opening and running the application
Once the application/executable has been downloaded on the users machine, they will need to open/run it.
If a user is having difficulties locating the file, they may more easily be able to locate the file by pressing CTRL + J on their keyboard within the browser where the download happened. This will bring the user to their downloads page within their browser.
Note: depending on what antivirus that the user is using, they may need to approve/whitelist the executable file that is ran.
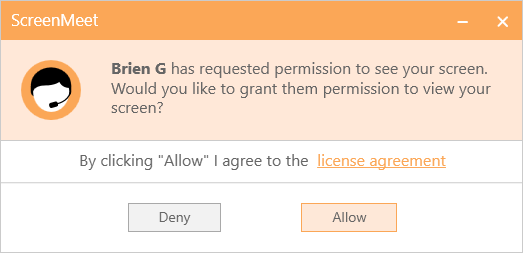
Once the user has ran the application, they will be greeted with the following screen. Simply have them click allow when ready to proceed with the support session.

The user will be able to identify that the session has started when a thin red border/outline appears on their screen.
Interacting within the session
Once a session has been started and the agent has joined the session, the user will be greeted with the following screen.

The user can pause the session if needed and also initiate a file transfer. They may also end the session whenever they would like as well.
At the bottom of the window above is a chat window that, if enabled, allows the user and agent to converse via text.
.png)
